Sending and Receiving message between onboard Raspberry Pi BLE and an Ardui​no with HM 11

Goal:

send messages between the HM 11 BLE modules and my Raspberry PI 3 with its onboard BLE.

How:

Bluez comes installed with the raspbian distro.

Wiring is basic UART for connecting the HM 11 to the Arduino. In my case, I am using a Teensy 3.6 programmed using the Arduino IDE.

Use this serial proxy sketch for getting started. if you have Arduino IDE, open this file. Teensy serial ports are on 0 and 1. I kept it software serial so its easy to adapt for any other board by just changing the pins used for the UART.

Thats all you need to setup on the Arduino side. Everything should work now.

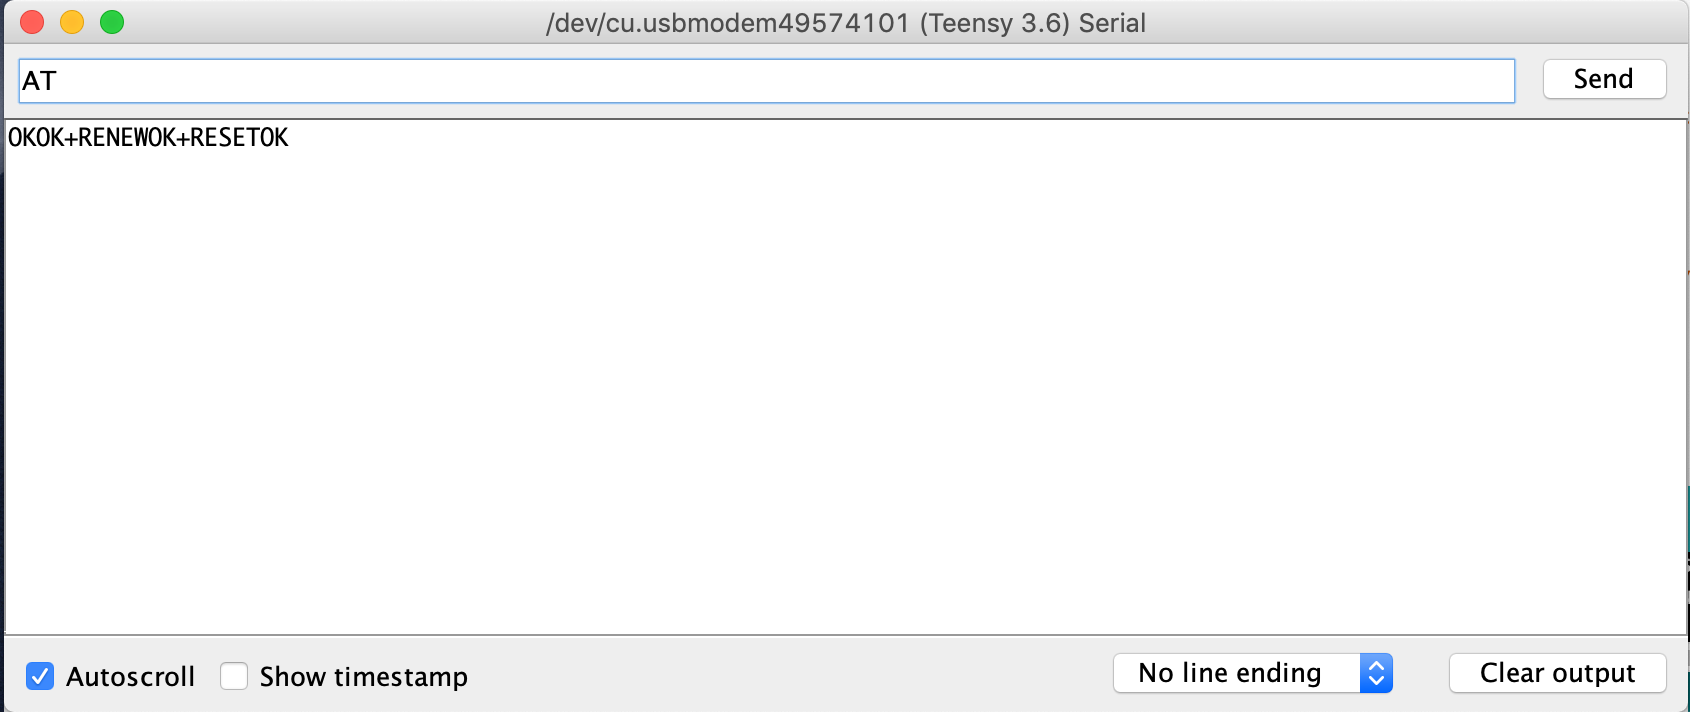
May be try a few AT commands. AT should give you OK if the module is used for the first time. if not OK+LOST which means that the module was connected previously which was lost. I would, either way, try the three AT commands just to be on the safer side. AT+RENEW, AT+RESET, AT.

If you make a PR request for adding a new line after every response from the HM 11 module, it would be great

Next step is to set up the raspberry pi, everything should be available directly up setting up an RPi with a new SD card. Be sure that you are using Raspberry Pi 3 and newer versions which have onboard BLE.

With Commandline:

With Python:

you should know the HM 11 Mac address. you should know it if you did it through command line. if not, you can do AT+ADDR? and add “:” after every two characters.

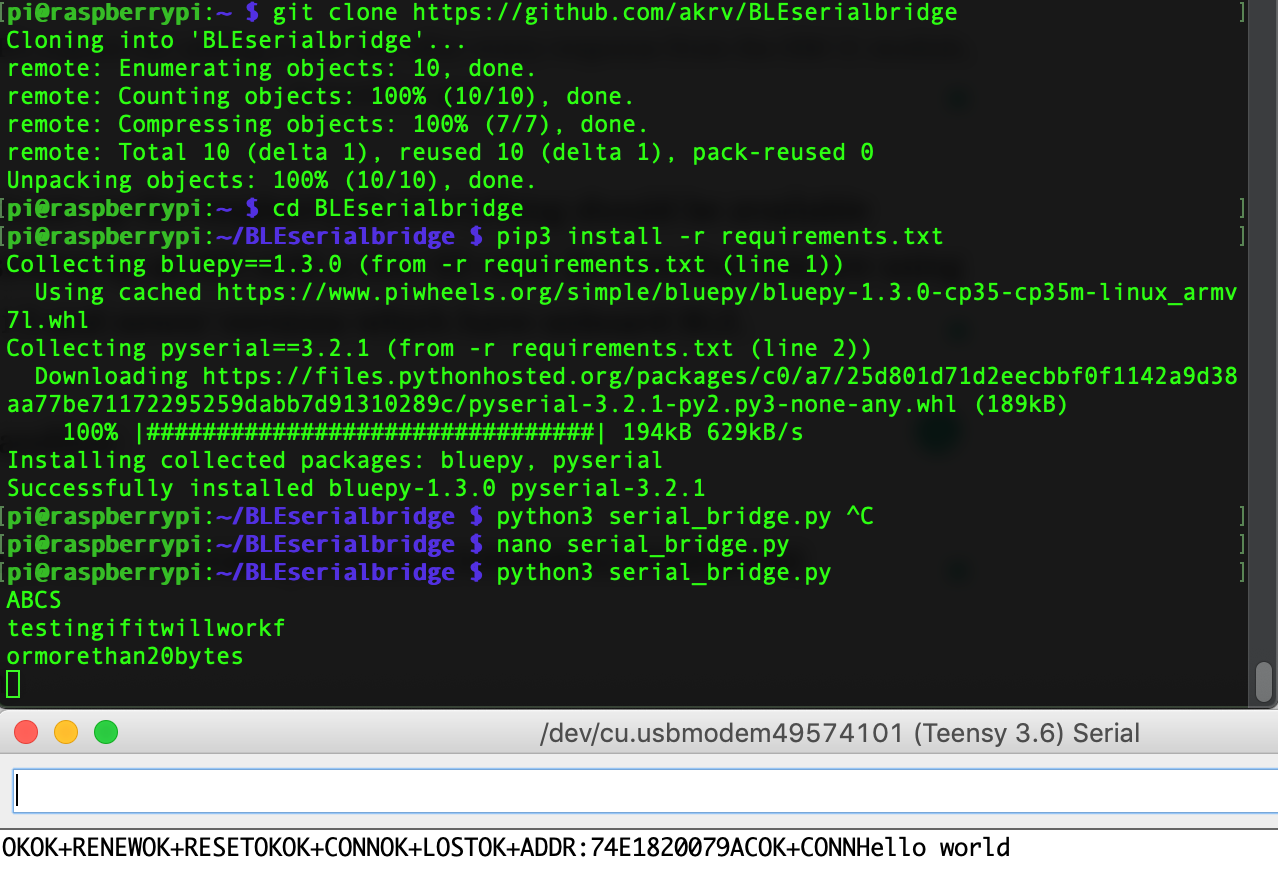
Install system dependencies, Go into the directory, Install the python dependencies. Before starting the python program, change the address that you want to connect. After you did that, start the program, it should send Hello world once to the device and wait for any messages. If you enter in the serial monitor, it will be printed out by the python program.

# sudo apt-get install build-essential python-pip3 git
# git clone https://github.com/akrv/BLEserialbridge
# cd BLEserialbridge
# pip3 install -r requirements.txt
# python3 serial_bridge.py
below is the AT Commands I sent since setting up the module.


Generating Heat Maps for eye-tracker data

Heatmap generated for the userXX

A heat map is a graphical representation of data where the individual values contained in a matrix are represented as colors. –Wikipedia

 Concept

Here is my approach to deal with it. All that is need is a frequency of a value being repeated in case of one dimension and then creating a color  map for high to low and plotting them on a graph. Continue reading “Generating Heat Maps for eye-tracker data”

WiFi Positioning System – Using Python and Google Geolocation API

I consider there is these following steps involved for such a program.

I will keep this as a documentation as well as a progress report to keep track of the project.

  1. Reading all the required information
    1. Reading SSID in MAC
      • Using Airport Shell command
      • Here is how it should look: [viraldownloader id=180]
    2. Reading SSID in Linux (Ubuntu), Windows
      • identify shell command for linux/Ubuntu
      • identify shell command for windows
  2. Parsing them in JSON format
    1. Parsing information into required information into prescribed format
  3. CURL and Get the Location information in JSON
  4. Parse it and display on google
  5. Building a GUI

Here is the gitHub repository for the project that I am working on.

https://github.com/akrv/pyWPSLocalisation

Feel free to contribute/contact it is interesting for you aswin[at]southpaw.in

Setting up your first psychoPy application in Eclipse

http://www.psychopy.org

I believe you have already ready the previous post about setting up the environment. if not do it here! <PSYCHOPY APP DEVELOPMENT IN PYTHON USING ECLIPSE AND PYDEV>

So, now you are for sure ready with the environment and already created your first application on python. But psychoPy? yes, its not a big deal, you are 80% complete from creating an application in psychoPy already.

These following steps hit the rest 20%.

Set up the interpreter to be psychoPy. This enables you to use psychoPY API. Continue reading “Setting up your first psychoPy application in Eclipse”

PsychoPy app development in Python using Eclipse and pyDev

Install and setup psychoPy and using Eclipse and python for development of applications. I developed an application that used a eye tracker. It was a great idea to use python to interface the eye tracker with the routine which was created using psychoPy.

Creating a new pydev module to start coding

In this post, it is only about installing psychoPy, Python, Eclipse, pyDev for Eclipse and starting a new project. Creating your first psychoPy application with its specification will be in the following post.

Continue reading “PsychoPy app development in Python using Eclipse and pyDev”